When my niece was born, I saw this wonderful little addition to our family…but mostly I saw a bundle of cuteness that I could dress up in anything I wanted. Poor kid. She was a guinea pig from the word go.
Have you heard that parents are often overwhelmed? Funny, I've heard that statistic too. Weird.
So when I " innocently" called my sister to inquire to see what Lily, my niece, was going to be for her first Halloween. I quickly tacked in "because I have an idea! And I'll make it!".
Sold.
And so started the creation of Captain Cupcake, infant super hero!
This costume is ridiculously easy with very little cost. It can go from an infant to heck, an adult, if you can find some onesie pjs big enough. God bless that person.
Here's what you need-
1)3 different colors of felt
2) A relatively plain onesie
3) 2 buttons of your choice ( I went with stars)
4) a yard of inch thick elastic, again your choice in color
5) A REALLY snazzy piece of spandex. I went with bright freaking yellow. I bought a half yard. You want something that goes down to the child's ankles. So this varies depending on how old the child is.
you also need-
- a piece of fusible interfacing. It can be found at any fabric store or
online
-an iron to adhere the interfacing
-a needle and thread ( don't freak out. you're hardly going to use it)
-a pair of scissors that will cut through fabric nicely
If you are not going to use the outfit more then once and it won't need washing then regular tacky glue will work
Crest-
I've provided a pattern to cut out Captain Cupcakes crest in the felt. I've also thrown in an extra lightening bolt one too. You may need to side it up or down depending on the size of the child.
Cut out each shape in the felt color of your choice.
Cut a shape for the outer crest and inner crest in the interfacing.
Follow the instructions for whatever your interfacing is and attach the two crests together( shape 1 to shape 2 ) using the heat from an iron. You can do this with glue too but I prefer interfacing so the crest does not get too stiff.
Assemble the cupcake using fabric glue, glueing one layer on top of another
Position cupcake in center of crest and glue down. Let all this dry fully.
When crest is dry, take interfacing cut from shape 1. Position it in center of onesie. Place interfacing directly below crest shape and using interfacing directions attach to onesie. Let crest cool.
Cape-
This is super easy. No pattern needed. Make sure fabric width and length fits the size of the onesie. Remember, we want this cape ankle length. Fold fabric in half.
Using the scissors cut out half the shape of the cape ( think about when you used to cut out paper snow flakes). Unflold. Voila! Cape.
Using pins to hold position, place upper corners of the cape on shoulder of onesie
Put a couple of tight stitched through cape and onesie to hold into place.
When cape is attached to onesie, sew on decorative stars to hide stitches and give it some super her panache!
Optional but but fun step! Cut elastic band to create head band and utility belt. I even added on a couple of more felt symbols.
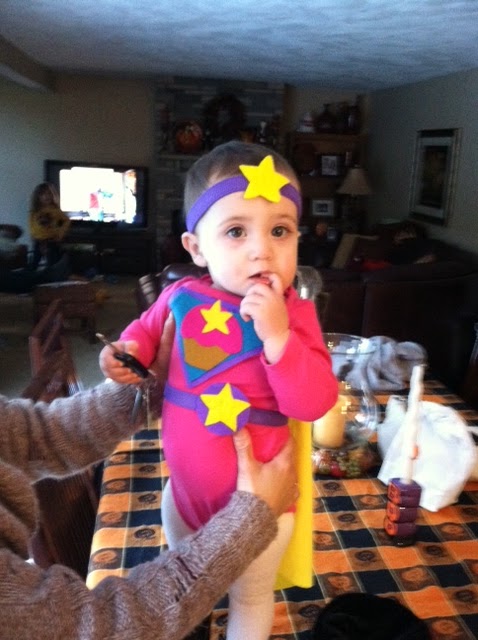
I give you……..CAPTAIN CUPCAKE!!!!!!!!!
.